Need support? :D

Today I received an A&K M249 Para (plus cash of course) in a trade for the Maruzen APS Type 96 (sigh didn’t get to use it much) BA rifle. Perhaps I’ll give sniping another try later, but anyway I’m glad that I have a support weapon again. šŸ˜€

Guns.jpgMaggie.jpg

The first picture gives you an idea on its size compared to my CA M4 and MP5. Heh doesn’t Maggie look scary? šŸ˜‰ Unloaded it’s ~6.8kg and is pretty much identical to Jason’s CA M249 Para. I’ll do a review on it later, heh busy playing with my new toy.

Airsoft Innovations Tornado Grenade Review

For many, airsoft is about simulation combat and one device that has been MIA from the scene is an effective grenade. The Escort, Deep Fire and PFI models (just to name a few) certainly look good but are not really practical to use due to low lethality. As a seasoned CQB player at the TTAC3 facility, I’ve had the luxury of trying many different grenades and all performed poorly.

The Airsoft Innovations Tornado Grenade promises to change the game that we play, both indoors and out. Besides BBs and gas, the AI Tornado is reusable like the Escort and Deep Fire grenades (if you collect all the extra parts that pop out with the latter two). In terms of ammo capacity the Tornado holds 180 BBs and can be used with either duster or propane. It’s ~130mm in height, has a diameter of ~55mm and fits in traditional M4/M16 type mag pouches or dedicated grenade pouches. To give you an idea on its size, here’s how the AI Tornado compares to a CA M4 low cap mag and the TG6 Thumper distraction device as well as the grenade in a variety of pouches.

Tornado_Package.jpgTornado_Size.jpg
Tornado_Pouch1.jpgTornado_Pouch2.jpgTornado_Pouch3.jpgTornado_Pouch4.jpg

Included in the retail package is the safety pin/resetting tool, bottom safety cap and user’s manual. I also got a bottle of AI’s grenade silicon oil which has a higher viscosity (sold seperately) than AI’s GBB silicon oil. It’s important to note which oil you’re using with the grenade and GBBs because GBB silicon oil is too thin for the grenade and grenade oil will gunk up the internals of a gun.

In the fourth picture, while it looks like the grenade is loose, when I’m wearing my HSGI Wasatch the grenade is secure even if I run around. The third and fourth pictures show the grenade in an Eagle smoke grenade pouch. That’s all I have at the moment will update when I have other pouches to test with.

Tornado_Plug.jpgTornado_Fill2.jpgTornado_Reset.jpg
Tornado_Fill.jpgTornado_Pin.jpgGraph.jpg

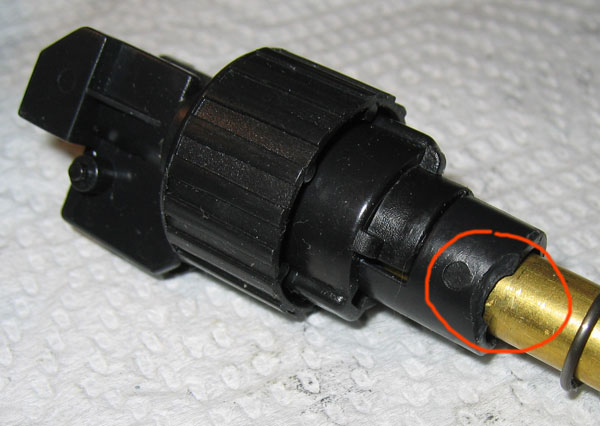
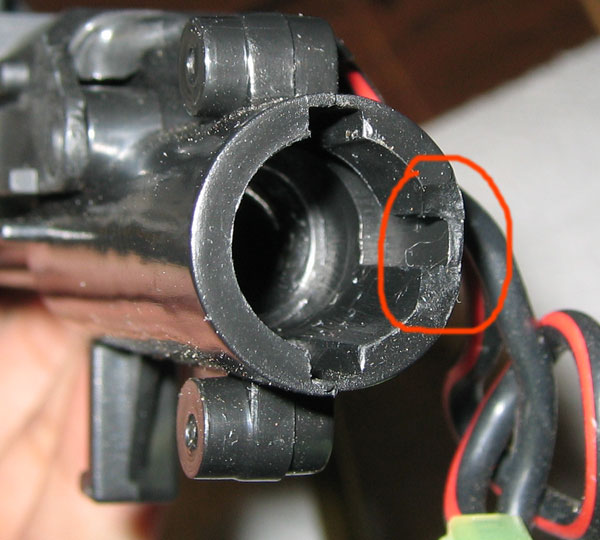
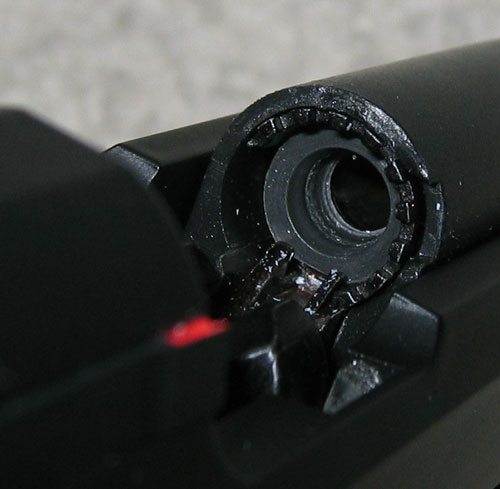
Prepping and loading the AI Tornado with gas is pretty straight forward. Unplug the cap which exposes the hole at the top of the grenade (in picture one, the hole is circled in red), reset the grenade by inserting the resetting tool if necessary and insert the pin into the appropriate delay spot (1.5s or 3s). After the stuff at the top is done turn the grenade over and fill with your gas of choice (3-5 seconds is long enough), it’s important that the safety pin has been inserted otherwise the grenade will go off and pop in your hands. In the User’s manual AI includes a handy chart which gives you an idea at what pressure duster and propane exerts at a given temperature and when the relief valve will kick in. If that does happen get a set of pliers, pull the relief valve on the bottom outwards then push it back in, that will reset it.

Tornado_Fill3.jpgTornado_Clip2.jpgTornado_Clip1.jpg
Tornado_Plate.jpgTornado_Wording.jpg

Filling the BBs is rather simple align your BB speed loader (or tube and rod if you’re old school), plug away till you meet resistance then repeat on the opposite side. The first few times you load may be difficult but once you find the angle that works things will be easy. Once the BBs are loaded, screw the bottom cap on and the AI Tornado is armed and ready to go. BBs are held in the grenade via clips at the entrance. If you forget the fill process, it is printed on the back of the grenade, along with the warnings and disclaimers. When armed with 180 BBs the Tornado does rattle ever so slightly but it’s not as bad as running around with a hi cap magazine.

Tornado_Pin2.jpg

Using the grenade is as easy as pulling the pin and tossing it into the area that you want to frag. Try and pull the pin straight out, if you pull it on an angle it may be difficult and it’s possible that you could bend the safety pin. Note since there is no spoon, you have to get rid of the grenade after pulling the pin or risk the Tornado going off In your hands and killing your whole team (happened to me a few times ;)). After tossing when the timer goes off, the Tornado starts to spin (be it in mid air or on the ground) and spews BBs in all directions.

I do not have the ability to chrony the Tornado however AI gives you an idea at its power with this YouTube video. It doesn’t hurt when you’re hit but BBs do strike with enough force that you know to call yourself out in an indoor environment. The timer employed by the AI Tornado is very consistent which makes the grenade very reliable to use.

In terms of effectiveness, it’s very useful in a CQB environment, clearing out campers in a defended position is a breeze and it also works quite well as a distraction device. Indoors the grenade can easily be effective in an area as large as 25 square meters!

Maintenance is easy, simply drop two drops of AI’s grenade silicon oil into the gas reservoir when the shuttle is in the forward position. AI recommend this be done every two times the grenade goes off and the grenade oil bottle has enough for about 600 throws.

I haven’t tried the AI Tornado outdoors yet however a teammate has used it a few times at FlagRaiders and it works best in airburst mode (the 1.5s delay). If the grenade hits dense grass or other vegetation though many times the Tornado does not have enough power to punch through or hit an opponent with enough force that they’ll know. After I have more experience with the Tornado outdoors, I will update this review with further thoughts.

Tornado_Side.jpg

I have been fortunate enough to be part of the Airsoft Innovations Tornado testing program since almost the beginning and it has been interesting to see the direction that MadMax has taken things. From the octopus prototype to the many possible release samples, the current iteration is certainly the easiest to use. Compared to the other grenades on the market, the AI Tornado is definitely the most combat effective and in CQB/indoors it rules. It might not look as nice as some of the other grenades out there but only chairsofters care about looks right? šŸ˜‰ With a retail price of $100 CDN, the AI Tornado is relatively expensive but for the price of other airsoft grenades, this offers you much more for the money.

KWA M9 PTP Pistol Update

I wanted to post this earlier but have been very busy in the last few weeks. Anyway a reader emailed me earlier in the year about his KWA M9 PTP pistol, the wings which align the outer and inner barrel with nozzle broke on his gun and was wondering if I had heard of the same thing. At the time I didn’t but it looks like my KWA M9 PTP has suffered the same fate.

Broken2.jpgBroken1.jpg

While the failure looks catastrophic, if I use a pin and push the remaining wing into place when putting the slide back on the gun does function just fine. Of course I’m not sure about any long term damage that may occur due to the cycling of the barrel being uneven. What makes the matter worse is Mark has a KWA M9 PTP and his gun failed in the exact same way.

From what I hear on the grape vine, this is an issue that affects first generation KWA M9 PTPs and has been resolved with second generation guns. Apparently if you email KWA, you can get the new generation replacement parts for $30 (free if it’s in the warranty period in the US) but I haven’t contacted them yet. Will update my progress when there’s more information.

Jing Gong G36 AEG Endurance Review

I’ve received quite a few requests via emails and PMs on Airsoft Canada for an update on my friend’s JG G36C and since about a year has passed, I figure it’s time to take a look at the gun again. Please keep in mind though that the gun is not stock and had installed metal bushings right from day one.

G36C1.jpgG36C2.jpg

The JG G36C has seen ~30 outdoor games, my teammate is not easy on her gun and despite going all out when playing cosmetically the AEG is in excellent condition. The high wear parts (like the pistol grip and handguard) have gotten a bit glossy but no more so than TM AEGs. I was rather surprised to see that the fire selector markings were still near mint and clearly visible on both sides. The 8.4V 1100mAh battery still keeps a full charge and has been the only battery used with the gun throughout the year.

I figure there would be a couple of issues with the gun and I was right (even though I was reassured that the gun was operating properly). Upon plugging the battery in and installing it into the fore grip, I pulled the trigger and with the gun set to semi, there was nothing. On full auto the gun fired just fine and the response was quick but on semi there was nothing. I planned to open up the mechbox to inspect the parts anyway and now I get to diagnose a problem yay…

Hopup.jpgHopup2.jpg

After taking out the mechbox, I noticed that the inner barrel was not secured to the outer barrel. Taking the whole assembly out of the body, I noticed that one of the tabs that holds the hopup unit and inner barrel to the outer barrel was broken and on the other side the outer barrel section that secures the hopup unit in place broke clean as well. G36 users know though that this is not too big a deal and the gun can operate without any issues. Working on a few other G36 guns, I noticed this happens to TM and CA models too.

Mechbox.jpgMechbox2.jpgGears.jpgPiston.jpg

The mechbox and the internal components were in excellent condition and there was little wear on any of the moving parts. Pictures say more than words can so click the thumbnails to get higher resolution images. I’m not sure what the problem with the gun was but after rebuilding the mechbox the JG G36C had no problems firing in semi.

Putting the gun back together, I loaded a mag with 0.2g BBs and it’s time to chrony the thing. According to my Guarder Speeder 2000, after 30 games and unknown thousands of rounds the JG G36C comes in firing at 355 fps on average. That’s 10-15 fps lower than when the gun was new but springs do lose power when they’re used.

There you have it, after a year’s worth of use the JG G36C is still functioning quite well. Yes there were a few problems here and there but it was nothing that a good gun doc couldn’t fix.

Hard wired to play videogames

Heh now when Maggie yells at me for playing videogames I can blame my biology. šŸ˜€ Evolution made me this way, yeah that works.

Allan Reiss, MD, and his colleagues have a pretty good idea why your husband or boyfriend can’t put down the Halo 3. In a first-of-its-kind imaging study, the School of Medicine researchers have shown that the part of the brain that generates rewarding feelings is more activated in men than women during video-game play.

TAC08 Airsoft Convention

On Saturday I attended Brian’s TAC08 airsoft convention at the FACT facility and it was great. The team (well Phil mainly) had decided to set up a table at the last minute and while I was doubtful at how things would go, I have to say it turned out very well. Heh aside from the retailers, I think it’s safe to say that the GHOSTS had the most impressive table that day. šŸ˜‰

Attendance topped out at 200+ people and man at times you really felt like sardines in a can! Anyway for most of the day I was at the team table fielding questions from newbie/novice players, which was quite fun and watching people oogle the various guns and toys on display. Jason’s toys definitely garnered the most attention but that’s not a surprise, the pulse rifle and CA M249 para look very nice. The more experienced players definitely moved towards Mario’s Systema M4A1 PTW. A few people noticed my ghillied up L96 but as JR said, it’s camo’ed and people can’t see it. šŸ˜‰ Besides guns, Steve had made up a few team posters and they looked absolutely awesome. Pictures do not do them justice and it really made our team look very professional. šŸ˜€

Later in the day there was a bit of a ā€œfashionā€ show and while we lost out to the Contras (who really are prettier) I still think we had the crowd in our favor. šŸ™‚ Not all was lost, I was able to beat out Bartek in the special forces impression. Anyway here are some pics from the day…

TAC08_1.jpgTAC08_2.jpgTAC08_3jpg.jpgTAC08_5.jpgTAC08_6.jpgTAC08_7.jpgTAC08_8.jpg

All in all a great day, I didn’t do any shooting this weekend but still had a very fun time showing off toys and talking to people. šŸ˜€

KWA M9 PTP Review

I recently received a KWA M9 PTP (Professional Training Pistol) so I figure I’d write a quick review on it. šŸ™‚ According to KWA the M9 PTP has been totally redesigned for better gas efficiency and reliability but since I do not have access to a first generation KWA M9, I can’t do a direct comparison. The gun is suppose to be a 1:1 copy of the real M9 and weighs in at ~1kg, one nice feature is that the weight is not all in the mag and it’s pretty well distributed.

M9_Side1.jpgM9_Side2.jpg

In typical KWA fashion, the gun is devoid of trademarks but that’s normal. The M9 PTP comes with a hefty metal receiver and slide but the outer barrel is plastic. The colour of the receiver is very slight matte brownish, the slide is a flat black and the outer barrel is matte flat black. The combination may bother some, but I don’t care much.

M9_SlideBack.jpg

On the err left hand side of the gun there’s the slide starting at the top right is the safety switch, there’s the slide lock, slide/barrel lock, trigger and mag catch button. On the right side we find the other side of the ambidextrous safety switch and a button (just below the circle near the middle of the gun) which needs to be depressed to disengage the slide/barrel lock.

As with all other GBB’s when the gun is empty the slide locks back, pop in a new mag, flick the slide lock down and you’re ready to rock and roll. The KWA M9 PTP is a double action pistol which means you do not have to rack the slide or cock the hammer to fire (although your first shot will be dry because no BB is chambered). One nice feature of the M9 PTP that no other airsoft M9’s have is its functional safety decocker (KWA is wrong when it says it’s the only one with this feature, KSC and WA M9s also support this). If the hammer is locked back, flick the gun to safety and the hammer will jump back into the forward position.

M9_Safety.jpgM9_Hopup.jpgM9_HopupTool.jpg

To access the hopup pull the slide back and lock it into place, once that’s done you’ll need the hopup adjustment tool (the one that comes with all KSC/KWA GBBs). It’s fairly simple to do but of course that means if you want to adjust your hopup on the field, you’ll need to carry it with you and it’s small and easy to lose unfortunately.

M9_Disassembled.jpgM9_Barrel.jpg

Taking down the KWA M9 PTP is very easy simply eject the mag, press the button on the right side, turn the slide/barrel lock and the slide the whole assembly forwards. To take out the barrel first remove recoil rod and spring, slide the barrel forward a bit so everything clears the nozzle then pull backwards. The inner barrel and hopup assembly is held in place with a pin so you’ll have to remove that first to get the whole thing out. The inner barrel looks like a normal KSC/KWA as does the hopup rubber. I think aftermarket rubbers (if they’re available) and regular aftermarket KWA M9 inner barrels would be compatible but I don’t have any to test compatibility with. If you lost your hopup adjustment key, you can adjust it now with your fingers.

M9_Sights.jpg

The iron sights are integrated into the pistol slide and are not adjustable but they’re very easy to use. The white dots make lining the gun up extremely fast and it’s possible to sight things with both eyes open.

Performance

Heh finally the good stuff… šŸ˜‰ The blowback of the KWA M9 PTP is nice and crisp, although it’s not strong, there’s less recoil than with my wife’s KSC Glock 19. According to KWA the M9 PTP is suppose to fire at 325 fps with 0.2g BBs when using propane but my Guarder Speeder 2000 records a muzzle velocity of 360 fps! With 0.25g the gun was shooting 350 fps and with 0.28g chronies 340 fps (same energy as ~400 fps with 0.2g!) GBBs are variable energy weapons which is why the heavier BBs have more energy.

The KWA M9 PTP requires a custom mag (second generation M9 mag) and is not compatible with first generation magazines. The KWA M9 PTP mag holds 25 rounds and in my condo at ~20 degrees Celsius I can get 30 shots from each gas fill. Not exactly the best gas efficiency but I guess it uses a lot in order to get that high muzzle velocity. KWA touts this new fill valve which it claims prevents gas from escaping during fill up, personally I prefer the old TM/KSC design as you know when the mag is full. With this one, I try and listen till the propane tank stops making noise or leave it for five seconds.

M9_1911.jpg
It’s about the same size as my TM M1911A1

I have yet to game with the gun so I cannot comment on its accuracy however KWA/KSC generally aren’t bad. I’m hoping that I can get its consistency up to TM levels but I guess that will have to wait for the spring outdoor season as the KWA M9 PTP fires too hard for TTAC3 (350 fps with 0.2g maximum). It’s new so there haven’t been any problems yet but when they arise I will be sure to post them. The KWA M9 PTP has a lot of potential, too bad I won’t be able to try it out till spring.

Apr 27/08 Edit: Please check this out too for an update on the KWA M9 PTP.

TM SOCOM MK23 is HUGE!

Just received a TM SOCOM MK23 NBB today and man this is a big gun! Even without the silencer, it’s considerably larger than my TM M1911A1 and due to its double stacked mag design it’s very thick too. It’s a bit too big for my hands, probably would look about right in Mark’s but oh well. šŸ˜‰ The MK23 is plasticy and a bit unbalanced but with the silencer attached is very quiet. It’s the perfect side arm to go with my sniper setup, this thing won’t give away my position if I need to turn to my sidearm on the field.

Pistols.jpg

Sweet! šŸ˜€

Woo Metal MP5K!

In the summer I acquired a Classic Army MP5K metal body (a tough thing to do here in Canada) but put off installation because a lot of modding was required to get everything to fit properly. Well after a night of swearing and elbow grease I give you a TM MP5K with CA metal body. šŸ˜€

MP5K.jpgMP5K2.jpg

The CA MP5K metal body is devoid of trades or any other markings but that’s not a big deal. I am pleasantly surprised how much heavier the MP5K is with the metal body and it feels very good to wield. There’s still some work to be done but I’m happy and figure I’d post about it. šŸ˜‰